Reading

Writing

Grammar

Showing posts with label freebie. Show all posts

Timeline {FREEBIE} Update!

My Timeline graphic organizer is my most downloaded freebie! I wanted to give it an extra update today... With that being said, I have given this resource a  makeover and added a Top 5 Uses {for this product} page! Timelines are a must have in any classroom, but how are they being used? Do you use them to complete the same task every time, or have you gotten creative with them? I'm going to share how I have used them in my own classroom AND a few new ideas that I thought of over summer break.


See the breakdown below for examples of each use.


#1 Sequence: The main use of a timeline, of course. Timelines are wonderful for using as a sequencing tool for many different learning levels.


#2 Tracking Characters: Track an individual character to show growth/changes throughout the story. Then, compare and contrast the character from the beginning to the end of the story.


#3 Finding Evidence: Have your students answer separate questions of your choice using these six boxes to respond. They can draw a picture in response to the question with evidence straight from the text to support their answer.


#4 Prewriting: Use this simple timeline as a prewriting tool for narratives. Your students can picture the sequence of the main events in their story before they even write.


#5 Novel Study: When it comes to longer books, things seem to blend together. Have your students keep a timeline of the entire book, chapter by chapter.


Download this multi-use FREEBIE right HERE! To view my collection of graphic organizers click here!
0

News-O-Matic + Main Idea = Engaging Test Prep!


Have you tried out the New-O-Matic app yet? Both my students and I would highly recommend it! This app features current event articles that are geared towards third/fourth or fifth grades. All of the articles that we scoped out today were both highly entertaining and informative. It kept my students engaged and wanting to read more, even when we were out of time! I love it when that happens!!!
When you log in, it asks you to select the grade level, then the main menu of articles pops up. The most recent articles are at the top. You can scroll down to view all available resources.

The best thing is, new pieces of nonfiction text are uploaded daily! That's what makes this such a great resource for my class. We have been focusing on a lot of nonfiction texts as we prepare for our standardized tests, making this a wonderful tool!

As I played with the app, I noticed several more features that I loved. For example,  each article comes with a fact, video, slideshow, drawing section, and more. Pictured below is the drawing feature for the students to make any notes while they read. It's easy to access and flip back and forth between the article and the drawing board.


Here's where main idea comes in... I gathered a few articles from News-O-Matic and stapled each of them onto separate pieces of construction paper. I made four sets for my class to use. Four sets is the perfect number for my classroom because this makes each group contain 3-4 students. The sample below shows how I set up each article. 

*Note: I ended up copying and pasting the articles into PowerPoint before printing them. This was the easiest way to print them from my laptop. I wanted a paper copy so my students had access to a hard copy that they could easily highlight or mark on. However, each student was still able to pull up the articles on their iPad for easy access. 


Pictured above: I have the construction paper divided into four sections: Main Idea, Detail #1, 
Detail #2, and Detail #3.

Once my students were put into groups, they read aloud each article, one at a time. Then, they came up with a main idea all together. After deciding on a main idea, each group member was in charge of finding a detail to add to their construction paper. The criteria for a detail meant that they had to use words from the text to prove that their main idea was correct.


I love that this is a teamwork activity! My students worked hard and collaborated together to explain what the text was about and how they could prove their thinking. The conversations around the room were right on track and showed me that they were building strong responses throughout the activity.

If you liked this, you can click here to view similar test prep activities! :)


1

Comparing Main Ideas: Deeper Thinking


Our second round of testing is right around the corner! Yesterday, we read Double Dutch from our Journey's book and focused on sequence. Today, I chose to compliment our story with an article about a double dutch team that I found online. Our goal for today was to find the main idea of both texts and then compare them. The wonderful thing about this activity is that you can use it with any two types of text. For this example, I chose a nonfiction story and an article. This template is super easy to use, all you have to do is determine which pieces of text you want to use with it. With that being said, this is one of the most crucial parts. Finding stories or articles that best fit your students is what will benefit them the most. 
When we read Double Dutch yesterday, we worked on a sequence activity. {Read about my sequence activity here!} Today, we reviewed a little but added the handout below. First, we worked together to fill out the left-hand side of the paper. We used this as a model for later. Next, I paired up my students having them read over their article together. Finally, they completed the right-hand side independently and turned it in for a quick assessment. In the end, we talked about how both main ideas relate and come together. 


I love that this activity allows my students to develop main ideas and compare them as well. This reinforces and deepens their learning on such a tough skill! Grab this freebie right here! :)


0

A Wall Full of Sequence

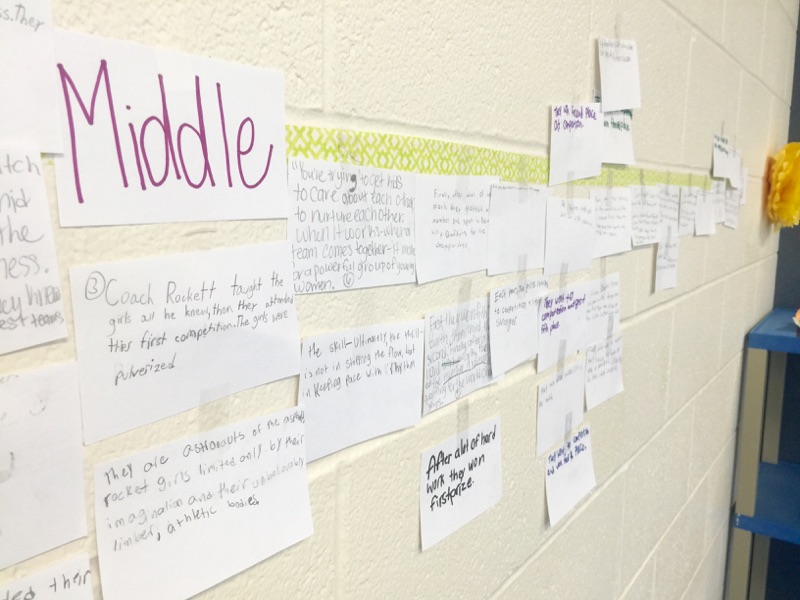
Today in fifth grade, we dissected our weekly reading store on our classroom wall! After reading Double Dutch, I had my students pair up and gave each pair of students eight blank index cards. Their instructions were to write down, in order the most important events throughout the story (using words from the text), illustrating these events on the backs of the cards. After they finished this part, we gathered as a whole class, and mixed all of the cards together. 


Next, they each began piecing the index cards on the wall timeline. My students were instructed to pick cards that were not theirs and decide where they should be placed on the timeline. If there were similar quotes, they were to put them on top of each other. Once more cards were applied, it got a little bit trickier. They reread sections of their story and had to look back at the text to see which pieces went where. 


I loved that the events were similar, but some of the words on the cards were different. This made the activity even more challenging. When we were finished, we took a step back to observe the final product. We talked about what they noticed or what stuck out to them. One of my favorite things mentioned was that the story and our activity both connected because they involved team work. I love it when a lesson comes together this wonderfully!


This is a super easy activity to incorporate with ANY story.... and you only need some tape/yarn/ribbon and index cards to make it work! I used colored Scotch masking tape that I already had on hand. Very minimal prep is what this teacher prefers!


0

Underlining Evidence In the Text

Citing evidence is such an important skill when it comes to standardized testing! As much as our students need practice on this skill, it's also important that we demonstrate different ways of implementing/applying this skill. 

One way that I like to zone in on improving citing evidence is by color coding and underlining words from the text. You can use any type of text that you feel is fitting for your students. You will need it to be in a printable version or a digital text where your students can use highlight the text digitally. 

For my students, I chose to use a printable text and colored pencils for color coding/underlining.


First, I decided which questions I wanted to ask my students. It is important that you select or use questions that will best benefit your students for this practice. For example, not all of the questions that I asked had a simple answer found in the text. Therefore, I created lines on the template for my students to restate the question along with their answer. Then, they will underline supporting evidence in the text that prove that their answer is correct. 

I love that this activity is LESS writing with MORE practice on this skill. You can get through more problems and work on mastering citing evidence rather than spending most of your time waiting for students to write down their answers.

If you want to use this in your classroom, you can grab my FREE template in my TpT store right here!


Thanks for reading and good luck with all of your test prepping this season! :)


11

Task Card Passports Are Here!

I absolutely love using task cards in my classroom! In order to incorporate task cards in a different light, I have created a Task Card Passport. Rather than just setting out different sets of task cards, I have intrigued my students with their own personal grammar passport! These passports will allow my students to review multiple grammar skills before our second round of standardized testing arrives. 


Here's how it works! Each student is responsible for completing each set of task cards on their passport. They will complete each set at a time, check their answers (as pictured above), bring their answer sheet and passport to me, and I will give them a stamp for each completed section. Once their passport is filled, they have completed their grammar review! To see how I have my students check their task cards, visit The Primary Gal's blog post here!


I made this passport completely editable to provide differentiation for your class. You can select specific activities that you want specific students to work on. You can have students complete three in a row if you do not want them to or have time to complete the entire page.  With this being editable, I have also included all of the fonts that are needed for your passport to look identical to the pictured passport above.

You can find all of the activities on my Grammar Passport here! If you love my grammar products, such as this one, checkout my Growing Grammar Bundle that includes PowerPoints, Sorts, Task Cards, Handouts, and Quizzes for each skill in this set.


Thanks for reading and be sure to subscribe to my blog for more activities like this one! :)


0

Dollar Spelling Test Template!

As I was going through last week's spelling tests, I noticed that I had just enough googly-eyed robot stickers (Target of course!) leftover from Valentine's Day! After, rediscovering these stickers, I thought now would be the perfect time to share my Editable Spelling List Template


Just print, cut in half, and use for your spelling tests! The best part, is that they are editable! No matter how many words your tests contain, you can adjust them as needed. It's a great, time-saving, dollar deal! 

If you like this product, checkout some of my other spelling products....

Melonheadz Edition Editable Spelling Menu- Completely editable, while providing differentiation for your students!


Editable Score Sheet {Freebie}- I attach these slips of paper to my spelling menus for easy scoring. Parents and students can easily see scores posted at the top of their spelling menus. They are editable so you can choose how many points you want your menu to be worth. This also makes it versatile for you to use with other products!

Spelling & Vocabulary List {Freebie}- Just plug in your spelling and vocabulary words for the week and send them home with your students! You an add this to your classroom newsletter or upload it digitally as a PDF to your choice of platform.


For more updates and new products, make sure you subscribe to my blog! :)


0

Comparing Two Texts

It's that time of year! The time when teachers prepare their students for their rigorous standardized tests. *Insert eye roll here* Although we dread this, (and so do our students) I try to make it as painless as possible. 
Over the last few weeks, we have been practicing juggling multiple texts, including nonfiction articles, literary pieces, newspaper articles, video clips, etc. This week I wanted to take a closer look at a picture book and a video clip. Of course, you can't go wrong by pairing Dog VS Cat (by Gail Fisher) and the ever so entertaining Dear Kitten: Regarding the Dog extended commercial. 


Talk about a perfect pair, these two align wonderfully for this purpose! Don't forget the best part, my students LOVED every minute of this activity! It was engaging, entertaining, and appropriate for our lesson. To tie both of these texts together, I've included a free graphic organizer (Comparing Two Texts) that you can get HERE!


Here's the break down...
First, I read aloud Dog VS Cat to my class. Then, I pass out the graphic organizer, Comparing Two Texts. I discuss the topics included as a whole class. I give them a few minutes to record observations they made during the first read. After going over all topics, I read Dog VS Cat one more time while they record the answers they didn't catch during the first read. I also challenge them to be more specific and detailed from the information that they had already recorded. Once they have completed the entire Dog VS Cat side, we move on to Dear Kitten

I have the students set their paper to the side and just WATCH the first time without taking any notes so they can focus only on the video clip. Give them a few minutes to record notes. Watch the video for a second time, recording any details they missed during the first viewing. 

When everyone is finished recording, we are ready to take a look over our graphic organizers as a class. I was super impressed with the responses I was receiving from all of my students. Some of my "hesitant hand raisers" even stepped out of hiding to willingly participate! 

I hope your class enjoys this activity as much as mine. I mean, who doesn't love the Dear Kitten videos?! Don't forget to checkout my other graphic organizers in my store here.


5

Sticky Note Editors

What teacher doesn't have a stack of these hanging out in their desk drawer?!


My students tend to say "Yes, Miss Murphy, I reread my paper and checked for mistakes." However, I really know this just means they are trying to make me happy by saying they checked their work. Not only do I want them checking for any errors, but I want them to check their writing as a whole. Does it fit the topic? Did I use persuasive words? Did I use fitting evidence from the text? Have I been descriptive enough with my characters or scenery? Do I have a solid story structure? How could I make this better? What do I LOVE about my writing?... These are the questions that I want my students asking themselves. 


I had my students partner up (I strategically gave them partners to balance out my students) to read each others essays. When they were finished, they each had a sticky note to write a piece of advice and a compliment for their partner's writing assignment.  This was perfect for my students! They were more engaged and interested in what they were publishing and reading from their classmates. It's a quick way of implementing student interactions and a positive classroom environment. Yes, they need improvement, but they also get to see that they are successful writers by the compliments they receive. It doesn't get any easier than pulling sticky notes out of your drawer! :)
Grab my Lined Paper Freebie here


If you like that, you can purchase the full version here, Lined Paper Pack or Version Two here! Enjoy! :)


0